Last updated 8/2/25
MOBILE MONITORING EQUIPMENT

The Viatom Checkme Pro vital signs monitor.
We are using a new type of lightweight monitoring equipment. Have a look at the video clips below to see how it works. It is currently in all the Medical Sacs (except M5) and in the two Training Medical Sacs. Please use the Viatoms in the training sacs to familiarise yourself with using them. There are recharging ports in the training room and equipment room, so recharge after use. All the Viatoms are charged weekly (Mo has responsibility for this), however, if any Viatom is used on a rescue it MUST be re-charged when you return to Base. There is a spare charged Viatom on the shelf by the AutoPulse. You can use this one for quick re-packing and put the used one on charge on the shelf. Once charged unplug and repack.
Applying the BP cuff
Position the patient’s arm away from the body so that cuff can be easily wrapped around the arm. Ensure the arm with the applied cuff is not in contact with the patient’s body or any other object as this could affect the reading.
Align the artery index marker over the brachial artery.
Apply the cuff approximately at the level of the middle of the upper arm overlying the biceps muscle. Do not put it on as far down as the elbow as this will interfere with the reading.
The cuff must fit snugly without being uncomfortably tight.
Keep the patient's arm by their side. In this position, the cuff will be at the same level as the heart.
The hose must be free of kinks and not pinched.
Applying the ECG leads
Hairy individuals may have to have hair shaved from the electrode sites. If the casualty is clammy/sweaty do your best to dry the sites first.
When both leads are properly connected (Red to the right, Green to the Left), confirm that the monitor displays the ECG waveform, heart rate, as well as any other patient data if the appropriate leads are connected. ECG readings can be affected by movement so encourage the casualty to lie still and not talk while you are waiting for the monitor to record. The Viatom will tell you if it is a normal or abnormal rhythm. Take a picture of the waveform if this would be useful.
Applying the Pulse Oximeter & SpO₂ monitor
This gives us two readings - the pulse and the SpO₂
As with the ECG, the SpO₂ readings can be affected by movement. This is because the contraction of muscles creates electrical activity which the monitor picks up. If the fingers are cold this will also affect the reading.
PROPAQ

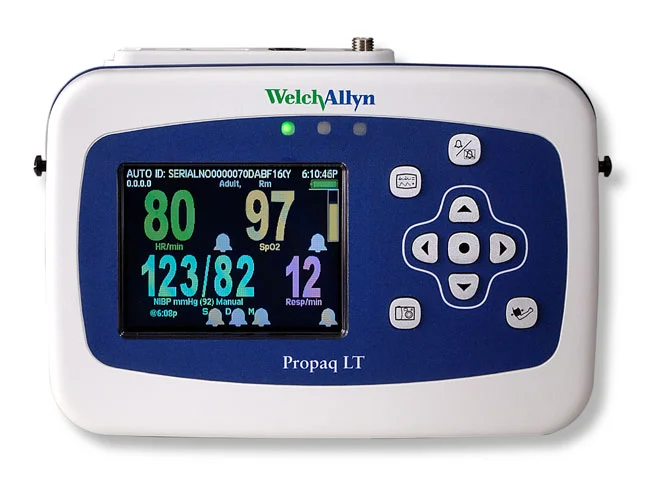
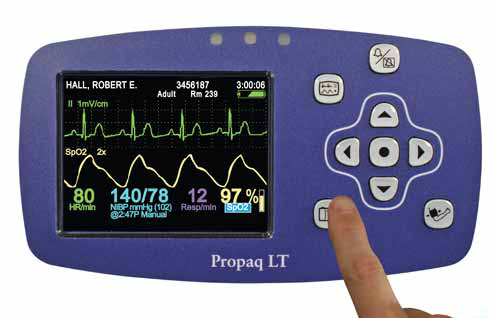
Propaq showing heart rate, SpO2, BP and respiratory rate.
The Propaq is a medical grade monitor and in its day, was used in hospital and prehospital situations. We mainly now use the Viatom because it is very much lighter, and it is great for quick snapshots of ECG, BP and SPO2 in casualties who are essentially cardiovascularly stable. However, the Propaq has several potential advantages in certain circumstances:
It allows continuous ECG monitoring (useful in a critically ill casualty) with a display that is more meaningful to healthcare professionals.
It uses 3 leads instead of two for the ECG, so the display can be configured to give the clearest reading.
Can display a pacemaker signal for people with an artificial pacemaker.
It can be set to give audible and visual alarms for two situations:
if a parameter (heart rate, BP or SpO2) goes outside present limits. For example, it can be set for to alert for a heart rate range 25-300 beats/min. Parameters that go outside the preset limits are displayed in red.
if a lead is disconnected e.g the pulse oximeter falls off the casualty’s finger, it will alarm.
It can be set to automatically check the BP regularly (1, 2, 3, 5, 10, 15, 30, and 60 minute intervals), which can be useful in unstable casualties as it saves us from having to remember to press the BP button.
Screenshot of a selected 15 second ECG strip, which is useful for later analysis and to show the receiving ambulance team.
We can print out the ECG, BP and SpO2 at Base.
Won’t be damaged if the AED is used while the monitor is still connected.
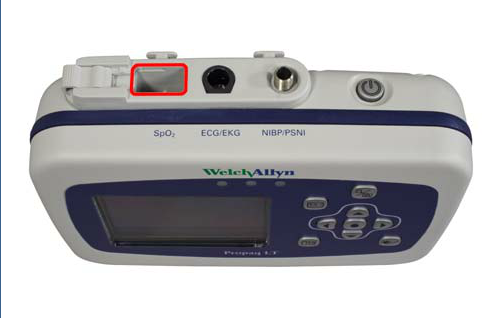
Connecting leads
The 3 connectors are clearly labelled:
SpO2 - multipin connector on the left.
ECG lead - middle multipin connector
BP - screw thread connector on the right
The button on the right is the on-off switch.
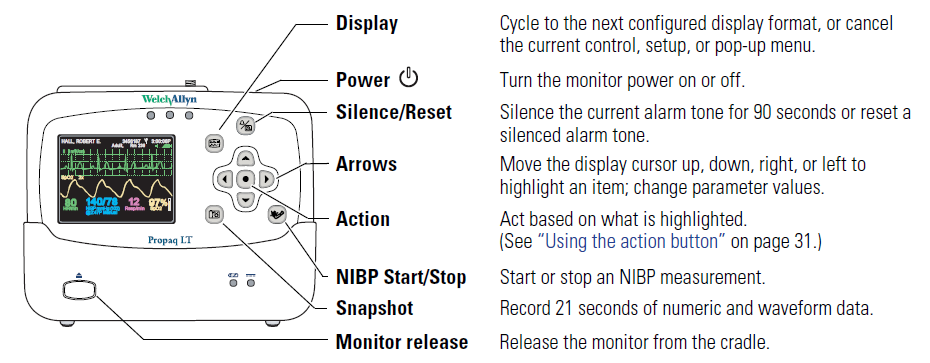
Buttons on the front of the monitor.
Switch on
To switch on, press the on-ff button (photo above).
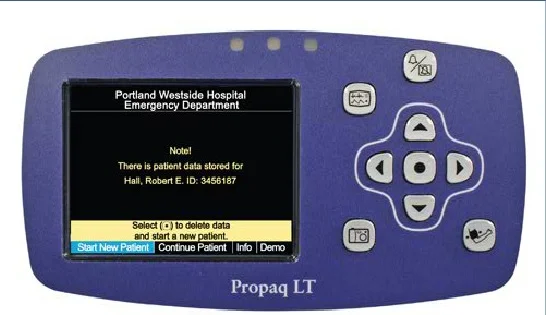
After a few self checks, this screen is visible.
Select Start New Patient if it is a new patient.
Select Continue patient if carrying on monitoring the same patient.
Move the blue cursor with the Left and Right arrow keys to select the chosen option. Select by pressing the dot button in the centre.
The first screen will display the key parameters when the appropriate leads are connected i.e. pulse rate, BP, SpO2, and also the time and battery charge (both at the top right).
Pulse rate (top left) and SpO2 will show as soon as the pulse oximeter is attached.
The BP (bottom left) will show after a BP reading has been done.
The respiratory rate only registers if the ECG electrodes are attached. However, it can be a little unreliable so is turned off.
The vertical bar on the right of the SpO2 number indicates the quality of the pulse signal. In a warm person with a normal BP, this will “bounce” up and down with each heart beat. By contrast, if the fingers are cold or the BP very low, it will hardly move at all.
There are two further displays. Change between each by pressing the top left button.
Screen 2 displays the ECG waveform in the main part of the screen, and the heart rate, BP and SpO2 are below.
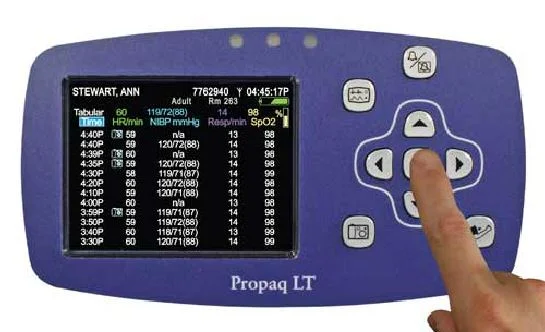
Screen 3 shows a table of all the readings.
Snapshot button (bottom left with camera icon)
This records 21 second display (14 seconds before + 7 seconds after the button press )of the ECG tracing, heart rate and SpO2 during that time.
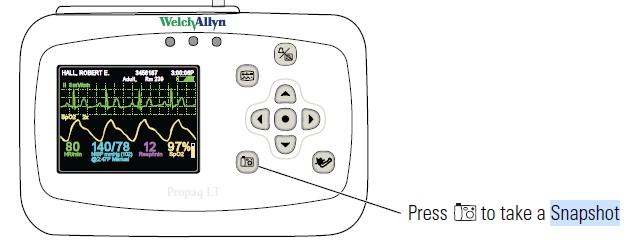
Snapshot button
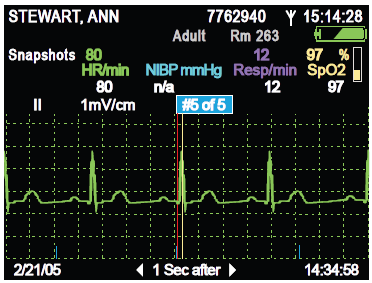
An example of the snapshot screen is shown on the right.
It includes the all the vital signs. Move along the snapshot using the left and right arrow keys.
ECG Rhythms Relevant To LAMRT
Whilst there are dozens of ECG rhythms, for our purposes in LAMRT, we only need to recognise two basic rhythms:
The normal ECG, also called normal sinus rhythm (shown above) + its common variants (very slow and very fast)
Asystole (see below)
FROM THE POINT OF VIEW OF CLINICAL MANAGEMENT GET TO KNOW WHAT THE NORMAL LOOKS LIKE.
CONSIDER ANYTHING ELSE AS ABNORMAL, AND BE ON HEIGHTENED ALERT, PARTICULARLY IF THE PATIENT ALSO HAS CARDIAC SYMPTOMS.
There are two additional rhythms worth knowing:
Ventricular fibrillation
Ventricular tachycardia
Sinus Rhythm
This is the heart's normal rhythm when viewed on an ECG. If you only learn one rhythm this is the one to learn. There are several requirements for a rhythm to be considered normal:
Rate between 60-100 beats per minute (in adults)
Regular i.e. the R waves are equally spaced out across the screen
There is a "P" wave present for every "QRS" complex